| Previous (Booting From The CD) | Up (Index) | Next (The Setup Program) |
Before you can begin the actual installation, you must prepare one or more hard disks to store the Linux operating system and related files. Linux normally requires at least 2 hard disk partitions for a standard installation. One is used as virtual memory and is called the Linux Swap partition, while the second is used to store the files themselves and is just called the Linux partition.
The Slackware CD provides 2 different tools that can be used to create or delete partitions. The first is called fdisk and the other is named cfdisk. The fdisk program is older and uses a sparse command line interface, while the newer cfdisk is controlled via menus.
NOTE: You can of course have more than 2 partitions
and/or drives. Multiple partitions are often created on servers. For example,
the /home directory is used by Linux for storing files created by users.
Often administrators may wish to setup an additional partition (or an entire
disk) just for that purpose. There are several good reasons to do this
including improved security, easier backups and performance gains. This
guide will show you how to create 3 partitions, one for the Linux Swap,
one for the / (root) directory and another for the /home
directory. Keep in mind that you do not have to do things this way at all.
Just 2 partitions, swap and Linux, are often used on personal workstations.
Naturally, the hard drive you want to use for the installation must have some free space. Slackware can be installed in as little as 500 MB or less, but in order to install all the software and give yourself some room to work in, you probably want 2 GB or more of drive space.
If you would like to run both Linux and Windows on the same computer, I highly recommend buying a second hard drive and adding it to your system. With hard drive prices falling lower and lower every day, this is the safest way to dual-boot your operating systems. In addition, if you already installed Windows, but forgot to reserve space for Linux, it is much safer to install Linux on a separate drive instead of trying to repartition the existing drive. Repartitioning a drive can be done, but it can be dangerous.
Now that we know what drive to use for the installation, we have to
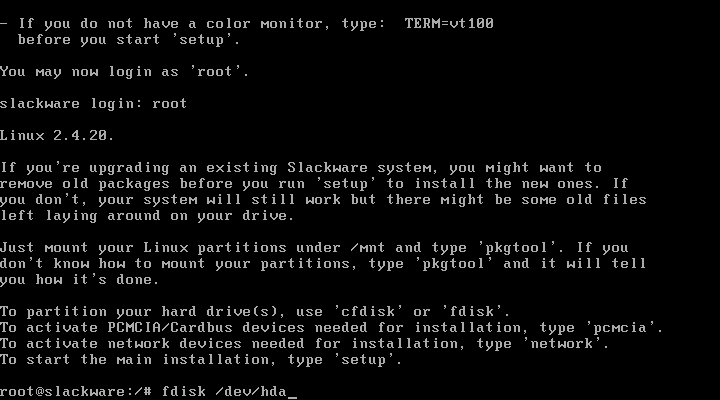
create the needed partitions. I will use the command 'fdisk /dev/hda'
to partition the IDE hard drive. Substitute the correct device name to match
your system as discussed in the previous section.

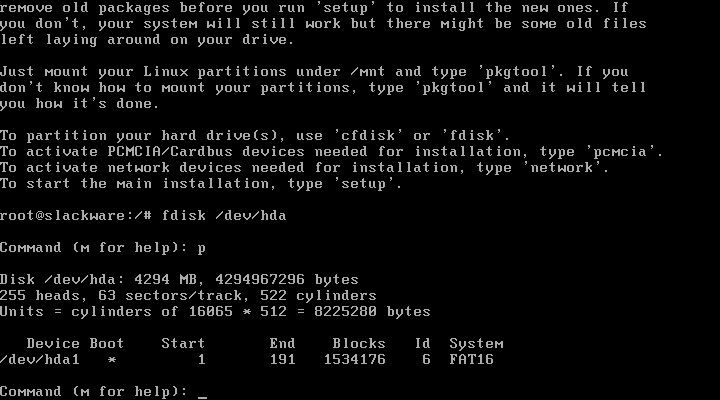
This first thing you should do is issue the p (Print) command. This will display the current partitions found on the drive. Here is how my system looked initially:
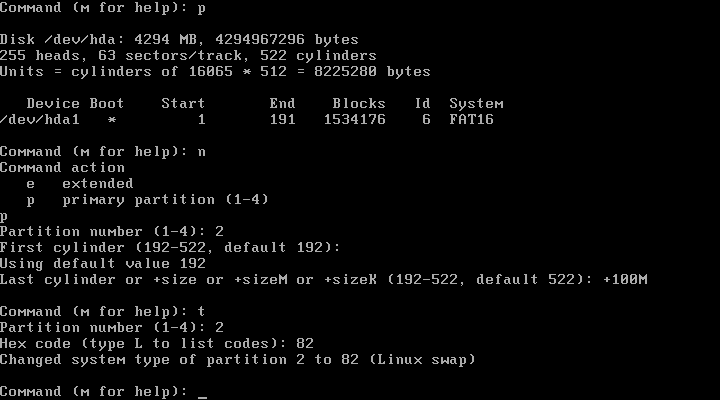
Next I created a small partition and set it up as my Linux swap partition.
This is done by issuing the n (New) command, followed by deciding
whether to create a primary or extended partition and then setting the desired
partition size. Finally, the partition type must be changed from the default
Linux partition to a Linux swap partition using the t
(Type) command. In the screen below I created a 100 MB swap partition
as the second primary partition (aka /dev/hda2).
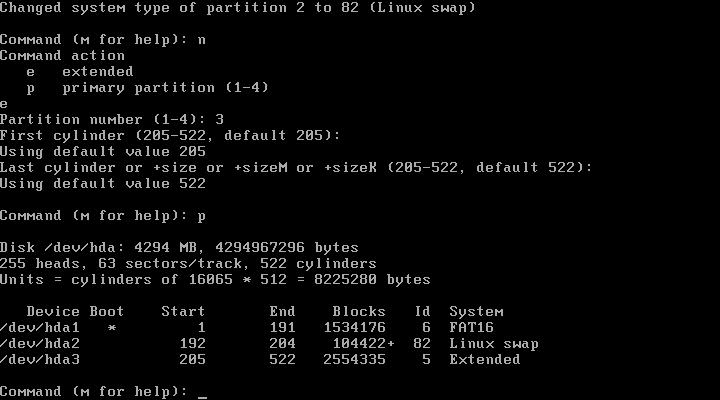
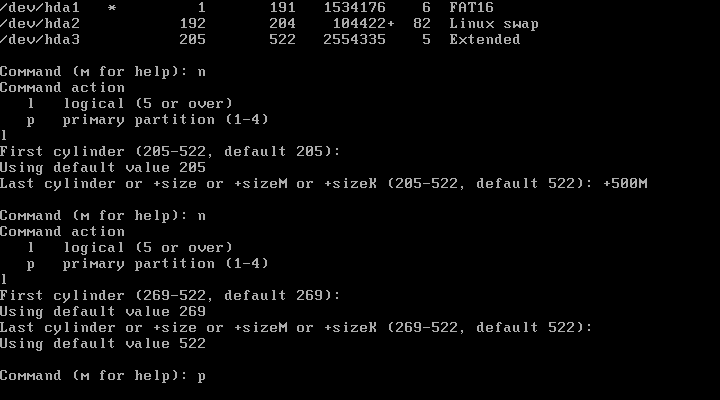
When working with hard drive partitions, it is important to know that there is a limitation on the number of partitions that can be created. By default, you can create up to 4 primary partitions, but no more. If you have a very large drive, this can be awkward. So, you also have the choice of creating one extended partition along with up to 3 primary partitions. The extended partition can be as large as the entire disk if desired. I do this in the screen that follows:
An extended partition cannot be used directly, but must be further
partitioned into smaller parts called logical drives. Linux will
number the logical drives as partitions, but all logical drives have
a partition number of 5 or higher. As you can see in the screen below,
I created 2 logical drives. The first is named /dev/hda5 and is
approximately 500 MB in size, while the second is named /dev/hda6
and it is about 2 GB in size. Later I will use /dev/hda5 for the
/home directory and /dev/hda6 as the main / (root)
directory.
NOTE: The fdisk command can also be used to delete partitions or create other kinds of partitions, such as FAT. Use the m (Menu) command to get a menu of available commands.
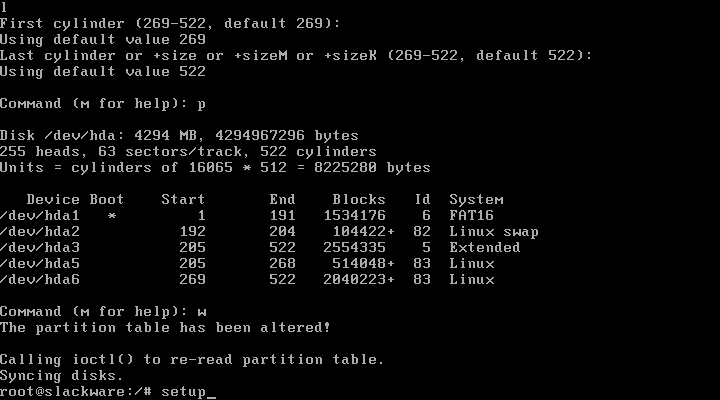
Finally, you should again print your partition table using the p (Print) command. If you made any mistakes, issue the q (Quit) command to exit without saving and rerun fdisk again. If your partitions all look okay, we are ready to save the changes and begin the actual installation process. Issue the w (Write) command to write the new partition table to disk and return to the shell prompt. If you have more hard drives, you can run fdisk for each and configure additional partitions. Once you are ready to install Slackware enter the command setup at the shell prompt.
| Previous (Booting From The CD) | Up (Index) | Next (The Setup Program) |